
In the digital age, images are an integral part of our daily lives, whether for personal use, professional presentations, or sharing across various online platforms. From capturing precious memories to crafting engaging content for websites, blogs, and social media, high-quality visuals play a crucial role. However, the convenience of modern cameras and smartphones often results in extremely large image files – files that, while offering exceptional detail, can be cumbersome to manage, slow down websites, choke email inboxes, and consume valuable storage space. This is where a reliable image resizer becomes not just a convenience, but a necessity for any Windows 10 user.
The challenge isn’t just about reducing file size; it’s also about adapting images to specific dimensions required by different platforms without compromising their visual integrity. Imagine trying to upload a multi-megabyte, high-resolution photo to a social media profile that demands a much smaller file, or attaching dozens of large images to an email that quickly exceeds attachment limits. Without a proper tool, you might resort to complex photo editing software, which can be overkill for a simple resizing task, or worse, end up with pixelated, stretched, or poorly cropped images.
Fortunately, Windows 10 users have access to a range of tools designed to simplify this process, with “Image Resizer for Windows 10” by Yunhua Software standing out as a notable free solution. This article will delve into the features and benefits of this specific application, explore its popular alternatives, and guide you through choosing the best image resizing tool for your needs, ensuring your images are always perfectly optimized for any scenario.
The Indispensable Role of Image Resizing in the Digital World
Before diving into specific applications, it’s crucial to understand why image resizing is such a vital practice. It goes beyond mere convenience, impacting performance, storage, and user experience across various digital domains.
1. Optimizing for Web and Online Platforms: Websites and online applications thrive on speed. Large, unoptimized images are one of the primary culprits behind slow loading times, which can deter visitors, hurt search engine rankings, and negatively impact overall user engagement. When an image is too large in terms of dimensions (width and height) or file size (megabytes), the browser has to download more data than necessary, leading to delays. Image resizers allow you to scale down images to the exact pixel dimensions required for a website layout, often reducing the file size dramatically without a noticeable loss in visual quality for online viewing. This ensures faster page loads, a smoother user experience, and better performance metrics. Social media platforms, e-commerce sites, and blogs all have recommended image dimensions and file size limits, making resizing an essential step before uploading.
2. Efficient Email Communication: Attaching high-resolution photos to emails is a common cause of bounced messages or clogged inboxes. Many email providers impose strict limits on attachment sizes. A single unoptimized photo can easily exceed these limits, making it impossible to share multiple images or even one very large one. Resizing images before sending them via email ensures they are manageable in size, allowing for quicker uploads and downloads, and preventing any issues with email service providers. This is especially useful for sharing vacation photos with family, sending design drafts to clients, or submitting documents with embedded images.
3. Saving Storage Space: Modern digital cameras and smartphones capture images at increasingly higher resolutions, resulting in multi-megabyte files. While great for printing large formats, these files quickly accumulate and consume vast amounts of disk space on your computer, cloud storage, or external drives. Resizing images, particularly those destined for digital-only use (like web galleries or social media), can significantly reduce their footprint, freeing up valuable storage without deleting the original high-resolution versions. This is particularly beneficial for users with limited SSD space or those looking to efficiently archive large photo collections.
4. Improving System Performance: Working with excessively large images in graphic design software or even basic photo viewers can strain system resources, leading to slower performance, crashes, or longer processing times. By resizing images to more manageable dimensions, you reduce the memory and processing power required to handle them, resulting in a smoother workflow, especially for those working on less powerful machines or multitasking with multiple applications.
5. Maintaining Visual Quality and Aspect Ratios: A good image resizer doesn’t just shrink files; it helps maintain the correct aspect ratio and image quality. Manually stretching or compressing an image without preserving its aspect ratio can lead to distorted, unprofessional-looking results. Dedicated tools often provide options to maintain the original aspect ratio, choose from predefined sizes, or set custom dimensions while intelligently scaling the image. This ensures your images look crisp and professional, regardless of their final size.
Given these critical aspects, it becomes clear that an image resizer is more than just a niche utility; it’s a fundamental tool for anyone who regularly interacts with digital images on their Windows 10 PC.
Deep Dive into Image Resizer for Windows 10 (Yunhua Software)
Among the plethora of image resizing tools available, “Image Resizer for Windows 10” by Yunhua Software emerges as a straightforward and highly accessible option. As noted on PhanMemFree, this application is a free utility specifically designed for Windows 10, catering to users who need a simple yet effective way to manage their image dimensions and file sizes.
The core appeal of Yunhua Software’s offering lies in its simplicity and efficiency. It avoids the complexity of full-fledged image editors, focusing solely on its primary function: resizing images. This targeted approach makes it incredibly user-friendly, even for individuals who are not technically inclined or new to photo manipulation.
Key Features and User Experience:
- Free and Accessible: The most significant advantage is that it’s completely free. This eliminates any financial barrier to entry, making professional-grade image resizing accessible to everyone, from casual users to small businesses operating on a tight budget.
- Simple and Efficient: The app is designed for speed and ease of use. Its minimalist interface means there’s no steep learning curve; users can grasp its functionality almost immediately. The process typically involves selecting images, choosing desired dimensions or presets, and letting the application do the rest.
- Individual or Batch Resizing: One of its standout features, highlighted on PhanMemFree, is the ability to resize images either individually or in batches. This is a massive time-saver for anyone dealing with multiple photos. Instead of opening and resizing each image one by one, users can simply select an entire folder or a group of images and apply the same resizing parameters to all of them simultaneously. This is particularly useful for preparing photo galleries for a website, compressing a collection of pictures for cloud backup, or standardizing image sizes for a presentation.
- User-Friendly Interface: The intuitive design ensures that navigation and utilization of its features are hassle-free. Beginners can operate the tool without confusion, and experienced users will appreciate the lack of unnecessary clutter, allowing them to complete tasks quickly. The focus is on functionality, with clear options for input and output.
- Optimized for Windows 10: Being specifically developed for Windows 10, the app is likely optimized to integrate well with the operating system, ensuring stable performance and compatibility.
- Versatile Use Cases: Whether you’re resizing images for social media platforms like Facebook, Instagram, or Twitter (each with its own size recommendations), preparing attachments for email, or fitting photos into documents for printing, this app offers a straightforward solution. It helps users avoid the frustration of images being too large to upload or too small and pixelated when displayed.
While “Image Resizer for Windows 10” from Yunhua Software provides a solid, no-frills solution, its simplicity means it might lack some advanced features found in more sophisticated tools, such as various interpolation methods for resizing, advanced cropping options, or extensive file format conversions. However, for the vast majority of users who simply need to quickly and efficiently change the dimensions and file size of their images, this free app serves its purpose admirably. It’s a handy tool that embodies the principle of doing one thing well, making it a valuable addition to any Windows 10 user’s utility belt.
Exploring Top Alternatives and Advanced Features
While Yunhua Software’s “Image Resizer for Windows 10” offers a clean and efficient solution, the world of image resizing tools is diverse, offering options with varying levels of complexity, features, and integration. Depending on your specific needs—whether it’s raw batch processing power, deep system integration, or additional editing capabilities—you might find an alternative that better suits your workflow. PhanMemFree lists several popular alternatives, each bringing its own strengths to the table.
Microsoft PowerToys Image Resizer: Seamless Windows Integration
One of the most notable and widely recommended alternatives, particularly for Windows power users, is the Microsoft PowerToys Image Resizer. As part of the larger Microsoft PowerToys suite, this tool benefits from seamless integration with the Windows operating system. It’s described as using “Sophisticated Programming” to allow users to resize images for free, and its elegance lies in its accessibility.
Key Advantages:
- Context Menu Integration: PowerToys Image Resizer integrates directly into the Windows File Explorer context menu. This means you can simply right-click on one or multiple image files, and an “Resize pictures” option appears. This level of convenience is unparalleled for quick, on-the-fly resizing without opening a separate application.
- Customizable Presets: Users can define their own custom resizing presets (e.g., “Small,” “Medium,” “Large,” “Phone,” “Desktop wallpaper”) or input specific pixel dimensions. This allows for rapid application of frequently used sizes.
- Image Format Support: It supports a wide range of image formats and can even convert images to a different format during the resizing process.
- Quality Control: Offers options for choosing the quality of the resized images, allowing a balance between file size reduction and visual fidelity.
- Open Source and Reliable: Being a Microsoft product and open-source, it benefits from active development, community support, and a high degree of reliability.
The PowerToys Image Resizer is an excellent choice for users who want deep system integration and a highly efficient workflow for batch resizing right from their file explorer.
Fast Image Resizer: Speed and Batch Processing
Fast Image Resizer is another popular option, specifically highlighted for its ability to “Batch resize multiple images simultaneously.” This tool emphasizes speed and efficiency, making it ideal for users who frequently need to process large numbers of images quickly.
Key Advantages:
- Optimized for Speed: As its name suggests, Fast Image Resizer prioritizes rapid processing. This is crucial for professionals or hobbyists who deal with hundreds or even thousands of images at a time.
- Dedicated Batch Interface: Unlike context menu tools, it often provides a dedicated interface where users can drag and drop multiple files, select output settings, and initiate the batch process. This can be more intuitive for large-scale operations.
- Simple Controls: While fast, it generally maintains a user-friendly interface, focusing on essential resizing options without unnecessary complexities.
If your primary concern is the speed at which you can resize numerous images, Fast Image Resizer is a strong contender.
Free Image Convert and Resize & Free Picture Resizer: Focus on Simplicity and Cost-Effectiveness
Tools like Free Image Convert and Resize and Free Picture Resizer often emphasize their dual capabilities: resizing and sometimes converting image formats. They are typically straightforward, offering a free solution for basic resizing needs.
Key Advantages:
- Batch Resizing: Both typically support batch processing, which is a common and highly desired feature for efficiency.
- Format Conversion: As their names suggest, they might offer the ability to convert images between different formats (e.g., JPEG to PNG, or vice versa) during the resizing process, adding extra utility.
- Completely Free: These tools adhere to the “free” model, making them accessible to everyone without any cost.
- User-Friendly: Designed for ease of use, they usually feature intuitive interfaces that don’t require technical expertise.
These options are perfect for users who need a free, reliable tool for resizing and occasional format conversion, without requiring advanced features or deep system integration.
ImageResizer (from Explorer) & Icecream Image Resizer: Convenience and Quick Operations
Some tools, like an unspecified ImageResizer that lets you “Resize your images from Explorer” or Icecream Image Resizer which claims to “Resize in seconds,” focus heavily on convenience and speed for individual or small batch operations.
Key Advantages:
- Context Menu (Explorer) Integration: Similar to PowerToys, some ImageResizer tools integrate into the Windows Explorer context menu, providing quick access.
- Rapid Resizing: Icecream Image Resizer specifically highlights its ability to resize “in seconds,” indicating a focus on a streamlined process and quick results.
- Drag-and-Drop Functionality: Many of these simpler tools support drag-and-drop, making it easy to add files for processing.
- Basic Presets and Custom Sizes: They generally offer standard presets and the option to define custom dimensions.
These tools are ideal for users who prioritize quick access and rapid execution for everyday resizing tasks.
Batch Image Converter: Beyond Just Resizing
Batch Image Converter (v2.8) is described as an “Uncomplicated batch image resizer and converter.” This type of tool combines the core resizing functionality with robust image format conversion capabilities.
Key Advantages:
- Comprehensive Conversion: Besides resizing, it can convert images to a wide array of formats (e.g., JPEG, PNG, TIFF, BMP, GIF), which is invaluable for compatibility across different platforms and applications.
- Batch Processing: As the name implies, it’s built for batch operations, allowing users to process many files at once.
- Additional Options: May include other batch operations like renaming, watermarking, or basic adjustments, expanding its utility beyond simple resizing.
For users who need a versatile tool that can handle both resizing and extensive format conversions in a batch, this category of software is highly beneficial.
Choosing among these alternatives depends on your specific needs. If you want deep Windows integration and robust features from a trusted developer, Microsoft PowerToys is an excellent choice. If sheer speed and volume for batch resizing are your priority, Fast Image Resizer might be better. For basic, free resizing with potential conversion, Free Image Convert and Resize or Free Picture Resizer will suffice. And for a balance of speed and convenience, dedicated “in seconds” resizers or those with explorer integration are appealing. Each tool fills a slightly different niche, ensuring that every Windows 10 user can find an image resizer that perfectly fits their workflow.
How to Choose the Right Image Resizer for Your Needs
With so many options available, selecting the ideal image resizer for Windows 10 can seem daunting. The “best” tool isn’t universal; it largely depends on your specific requirements, usage frequency, technical proficiency, and desired features. Here’s a guide to help you make an informed decision:
1. Assess Your Primary Use Case
- Occasional Individual Resizing: If you only need to resize one or two images occasionally for email or a single upload, a simple, lightweight tool like Yunhua Software’s Image Resizer for Windows 10 or an online resizer might suffice. Speed and ease of use will be paramount.
- Frequent Batch Processing: For photographers, web developers, content creators, or anyone dealing with numerous images regularly, batch processing is a must. Tools like Microsoft PowerToys Image Resizer, Fast Image Resizer, or Free Image Convert and Resize excel here.
- System Integration: If you value convenience and want to resize directly from File Explorer, Microsoft PowerToys Image Resizer is the gold standard.
- Additional Editing/Conversion Needs: If you also require format conversion (e.g., converting HEIC to JPG), basic cropping, or watermarking, look for tools that offer these extra features alongside resizing, like Batch Image Converter.
2. Consider Ease of Use and User Interface
- Beginner-Friendly: If you’re not tech-savvy, opt for applications with a very intuitive, clean interface and minimal options. Yunhua Software’s Image Resizer for Windows 10 is a prime example of this.
- Intermediate Users: Tools with a few more options, like customizable presets or quality settings, will appeal to those who want a bit more control without overwhelming complexity.
- Advanced Users: If you need granular control over every aspect of resizing, including interpolation methods, output folders, and metadata handling, you might look into more robust utilities or even professional photo editing software that includes resizing capabilities.
3. Evaluate Features and Functionality
- Batch Processing: Can it handle multiple images simultaneously? This is a critical feature for efficiency.
- Output Quality Control: Does it allow you to adjust the quality (e.g., JPEG compression level) to balance file size and visual fidelity?
- Preset Sizes: Does it offer predefined sizes for common uses (e.g., web, email, social media banners)? Can you create custom presets?
- Aspect Ratio Preservation: Does it automatically maintain the original aspect ratio to prevent distortion?
- File Format Support: What input and output formats does it support (JPG, PNG, GIF, BMP, TIFF, HEIC, etc.)? Broader support is generally better.
- Destination Folder Options: Can you specify an output folder, or does it save resized images in the same folder as the originals (with a different name)?
- Watermarking/Renaming: Does it offer any additional batch operations like adding watermarks or renaming files?
- Performance: How quickly does it process images, especially large batches?
4. Check for Integration and Compatibility
- Windows 10 Compatibility: Ensure the tool is fully compatible and optimized for Windows 10.
- Context Menu Integration: For maximum convenience, consider tools that integrate into the Windows File Explorer right-click context menu.
- Standalone Application: Some prefer a dedicated application window for managing their resizing tasks.
5. Price and Licensing
- Free vs. Paid: Many excellent image resizers are available for free, including Yunhua Software’s Image Resizer for Windows 10 and Microsoft PowerToys. Paid options often come with more advanced features, professional support, or integrate into larger suites. For most casual to semi-professional users, free tools are often sufficient.
- Open Source: Open-source tools (like PowerToys) often benefit from community development and transparency.
6. Security and Reliability
- Developer Reputation: Download software from reputable sources or well-known developers (e.g., Microsoft, Yunhua Software as listed on PhanMemFree).
- PhanMemFree (formerly Softonic) Verification: PhanMemFree, for example, states that it scans all files to assess and avoid potential harm, providing a “Clean” status for reliable programs. Always look for such assurances.
- User Reviews: Check user reviews and ratings to gauge the experiences of others with the software.
By carefully considering these factors, you can narrow down your options and choose an image resizer that not only meets your current needs but also enhances your overall digital workflow on Windows 10. Whether it’s the straightforward simplicity of Yunhua Software’s tool or the robust integration of Microsoft PowerToys, there’s a perfect solution waiting for you.
Installation and Usage Tips for Image Resizers on Windows 10
Once you’ve chosen an image resizer, getting it up and running and using it effectively is the next step. While specific instructions might vary slightly between applications, the general process for most Windows 10 image resizers, especially the free and simple ones, follows a common pattern.
1. Downloading the Application
- Visit a Reputable Source: Always download software from trusted platforms. For tools like “Image Resizer for Windows 10” by Yunhua Software, you would typically find it on a site like PhanMemFree (formerly Softonic.com) or the official developer’s website.
- Verify Security Status: Before downloading, check for security status indicators provided by the download portal (e.g., PhanMemFree’s “Security Status: Clean”). This helps ensure the file is free from malware.
- Click Download: Locate the “Free Download for Windows” or similar button and click it to initiate the download. The file will typically be an executable installer (.exe).
2. Installing the Software
- Locate the Installer: Once downloaded, find the installer file (usually in your “Downloads” folder) and double-click it.
- Follow On-Screen Prompts:
- User Account Control (UAC): Windows might ask for permission to run the installer. Click “Yes.”
- Welcome Screen: Click “Next” or “Continue.”
- License Agreement: Read and accept the terms and conditions if you agree.
- Installation Location: Most users can stick with the default installation path, but you can change it if you prefer.
- Additional Options: Some installers might offer to create desktop shortcuts or integrate with the Windows context menu. For an image resizer, context menu integration (like with PowerToys) is highly recommended for convenience.
- Complete Installation: Click “Install” and wait for the process to finish. Click “Finish” or “Close” once done.
3. Basic Usage Guide
While each app has its nuances, the core steps for resizing images are often similar:
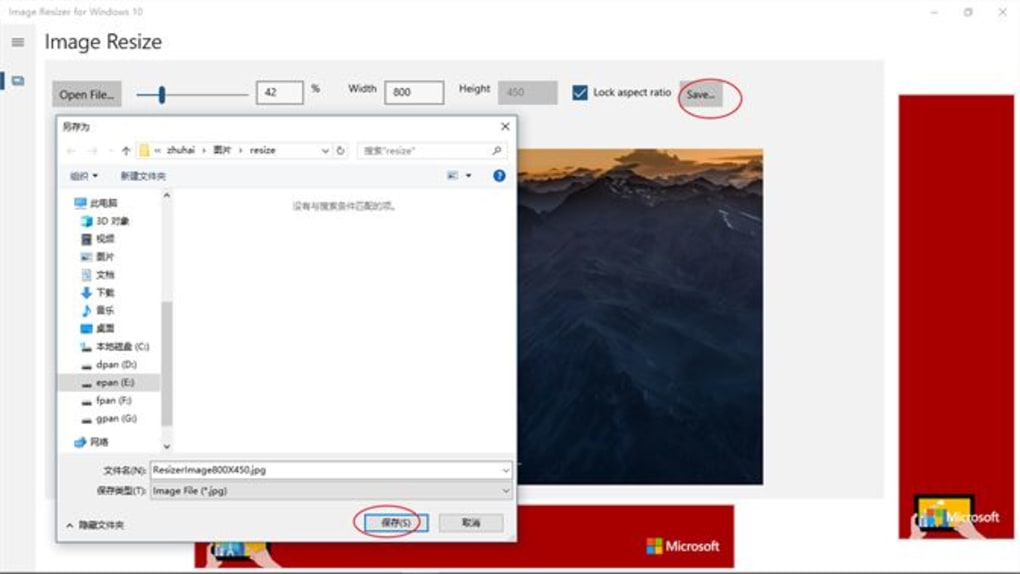
A. Using a Standalone Application (e.g., Yunhua Software’s Image Resizer, Fast Image Resizer):
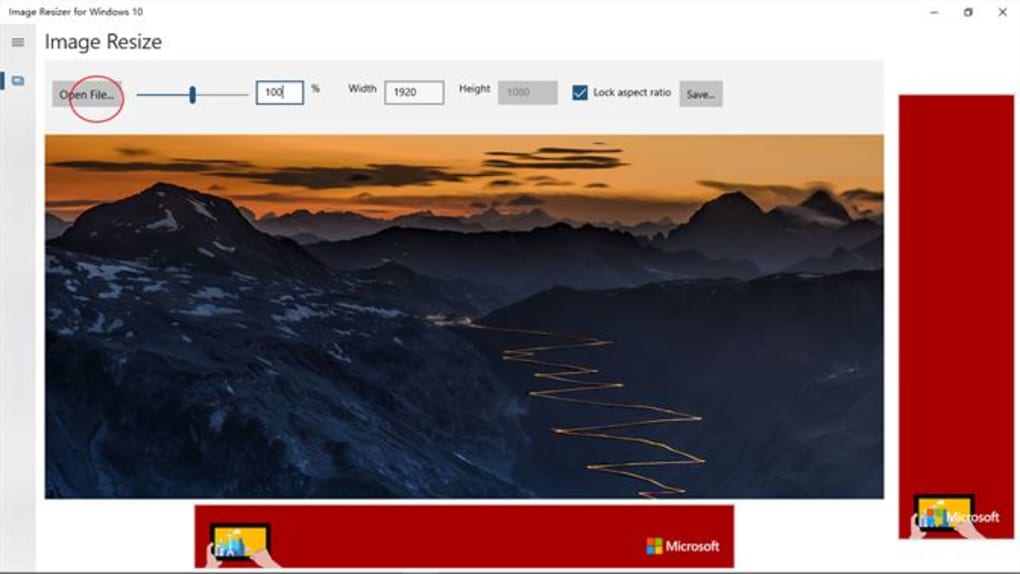
- Launch the Application: Find the application shortcut on your desktop, in the Start Menu, or by searching for it.
- Add Images:
- Click an “Add Files,” “Add Folder,” or “Browse” button to select the images you want to resize.
- Alternatively, many apps support drag-and-drop. Simply drag your image files or an entire folder of images from File Explorer directly into the application window.
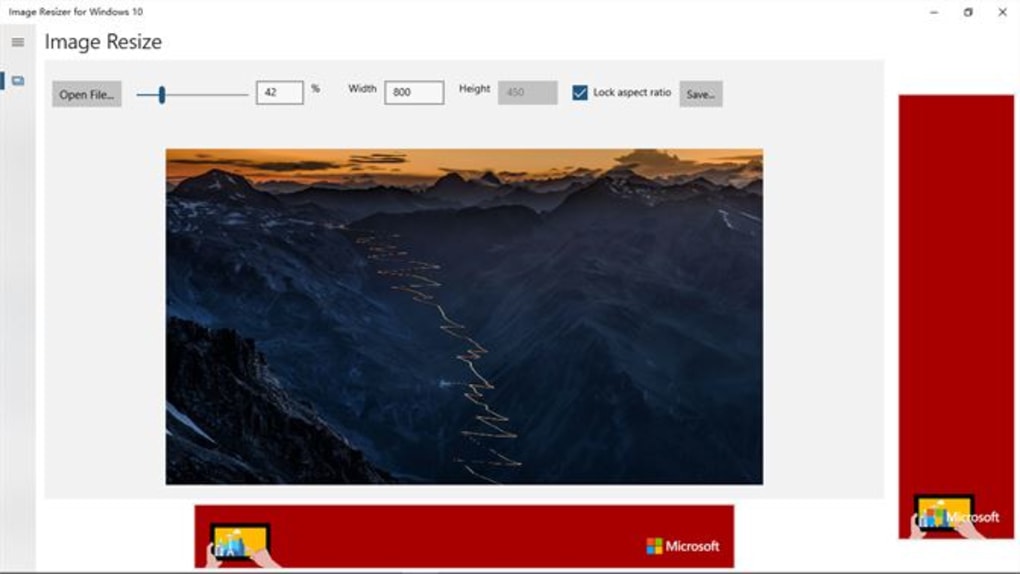
- Choose Resizing Options:
- Dimensions: You’ll typically find options to:
- Choose from predefined sizes (e.g., “Small,” “Medium,” “Large,” “Email”).
- Enter custom width and height in pixels.
- Resize by percentage (e.g., 50% of original size).
- Maintain Aspect Ratio: Most good resizers will have a checkbox or option to “Keep aspect ratio” or “Constrain proportions.” Always ensure this is selected unless you specifically want to stretch or compress your image.
- Output Format: If the tool supports conversion, you can choose the desired output format (e.g., JPG, PNG).
- Quality: For formats like JPEG, you might be able to adjust the compression quality (e.g., 80% or 90%). Higher quality means a larger file, lower quality means a smaller file (and potential artifacts).
- Output Folder: Specify where the resized images should be saved. It’s often best to save them to a new folder to avoid overwriting your original high-resolution files.
- Dimensions: You’ll typically find options to:
- Start Resizing: Click a “Resize,” “Process,” or “Convert” button to begin the operation.
- Review Results: Once completed, navigate to your specified output folder to check the resized images.
B. Using Context Menu Integration (e.g., Microsoft PowerToys Image Resizer):
- Select Images: Open File Explorer and navigate to the folder containing your images.
- Right-Click: Select one or multiple image files (hold Ctrl to select multiple individual files, or Shift for a range), then right-click on your selection.
- Choose “Resize Pictures”: In the context menu that appears, click on the “Resize pictures” option.
- Select Resizing Profile: A small dialog box will pop up.
- Choose from predefined size presets (e.g., “Small,” “Medium,” “Large,” “Phone”).
- Select “Custom” to enter specific pixel dimensions.
- Check “Ignore the orientation of pictures” if you want to resize regardless of portrait or landscape.
- Check “Make pictures smaller but not larger” to prevent upscaling.
- Check “Remove metadata” if you want to strip EXIF data (like camera model, date, location).
- Encode (Optional): You can also select the encoding options, such as the output format and desired quality.
- Resize: Click the “Resize” button. The resized images will typically appear in the same folder as the originals, with a suffix (e.g.,
image-small.jpg) to differentiate them.
4. Important Usage Tips
- Always Backup Originals: Never overwrite your original high-resolution images. Always save resized images to a new folder or with a new file name. This preserves your master copies for future use, printing, or different resizing needs.
- Understand Quality vs. Size: Experiment with quality settings. For web use, a JPEG quality of 70-85% is often sufficient to achieve small file sizes with minimal perceptible loss of quality.
- Dimensions for Specific Platforms: Be aware of the recommended image dimensions for common platforms like Facebook, Instagram, Twitter, LinkedIn, and your website. Resizing to these exact specifications will yield the best results.
- Avoid Upscaling: Generally, avoid making images larger than their original dimensions (“upscaling”) unless absolutely necessary. Upscaling often leads to pixelation and a significant loss of quality. Most resizers include an option to “make pictures smaller but not larger.”
- Check File Size: After resizing, always verify the new file size to ensure it meets your requirements (e.g., below email attachment limits or optimized for web).
By following these guidelines, you can effectively use any image resizer on Windows 10, ensuring your digital images are perfectly optimized for every purpose, saving you time, storage, and frustration.
Conclusion: Empowering Your Digital Workflow
In an increasingly visual digital landscape, the ability to efficiently manage and optimize images is no longer a luxury but a fundamental skill for anyone using a computer. Whether you’re a casual user sharing family photos, a student preparing a presentation, or a professional curating content for the web, the necessity of properly sized images cannot be overstated. Large, unoptimized images can lead to slow website performance, frustrating email attachment limits, and unnecessary consumption of valuable storage space.
The “Image Resizer for Windows 10” by Yunhua Software, as highlighted on PhanMemFree, offers a compelling solution for these common challenges. Its commitment to being a free, simple, and efficient tool makes it an excellent entry point for anyone needing to resize images without the complexity of advanced photo editors. Its capability for both individual and batch processing, coupled with its user-friendly interface, ensures that users of all skill levels can quickly and effectively prepare their images for any digital destination.
Beyond this specific application, the market provides a rich ecosystem of alternatives. From the deep system integration and power-user features of Microsoft PowerToys Image Resizer to the pure speed of Fast Image Resizer, and the versatile conversion capabilities of Batch Image Converter, there’s a tool designed for every specific workflow and preference. Sites like PhanMemFree continue to be invaluable resources for discovering and evaluating these applications, providing essential information to help users make informed choices.
Ultimately, choosing the right image resizer boils down to understanding your individual needs: how frequently do you resize images? How many at a time? Do you need advanced features like format conversion or metadata removal? By carefully considering these questions and exploring the robust options available for Windows 10, you can equip yourself with the perfect utility to streamline your digital workflow. An optimized image is not just a smaller file; it’s a faster website, a clearer email, a more professional presentation, and ultimately, a more efficient and enjoyable digital experience. Embrace these tools, and take control of your images with confidence and ease.
File Information
- License: “Free”
- Version: “2.0”
- Latest update: “February 14, 2024”
- Platform: “Windows”
- OS: “Windows 10”
- Language: “English”
- Downloads: “7.9K”


