
Samsung Odin is a free utility program developed by Samsung for PCs. Primarily used as a ROM flashing tool, it allows users to install custom ROMs onto their Samsung devices. This powerful tool supports a wide range of Samsung models and can be used with both official ROM releases from Samsung and custom ROMs developed by the community. While its primary function is ROM flashing, understanding its capabilities and limitations is crucial before use. This guide will explore the intricacies of Samsung Odin, its functionalities, prerequisites, usage instructions, potential risks, and alternatives.
Understanding Samsung Odin and ROM Flashing
At its core, Samsung Odin acts as a bridge between your PC and your Samsung device, facilitating the installation of new firmware or operating systems (ROMs). A ROM, or Read-Only Memory, houses the core operating system of your device. While your phone comes pre-loaded with a ROM, advanced users often choose to flash custom ROMs for various reasons, including gaining access to new features, improving performance, enhancing security, or simply customizing the look and feel of their device.
Unlike simple software updates performed through the device’s settings, ROM flashing involves a more complex process that requires technical knowledge and careful execution. Odin streamlines this process, providing a user interface to manage and execute the flashing operation safely (when used correctly). However, improper usage can lead to severe consequences, as detailed later.
The process of flashing a ROM using Odin typically involves placing your Samsung device into “Download Mode,” a special boot mode that allows communication with Odin. Odin then uses a designated file (the ROM) to rewrite the system partition on your device, effectively installing the new operating system. This process replaces the existing system files with the ones contained in the ROM file. This means that all data on your device will be erased; it’s essential to back up any important data before beginning the flashing process.
Prerequisites for Using Samsung Odin
Before embarking on the ROM flashing journey using Odin, ensure you have all the necessary components. Failing to meet these prerequisites can lead to complications or prevent the process from completing successfully. The essential requirements include:
-
A Compatible Samsung Device: Odin is specifically designed for Samsung devices. Check the Odin compatibility list (often available online within various Samsung and Android modding communities) to confirm that your specific device model is supported. Using Odin with an incompatible device could result in irreversible damage.
-
The ROM File: This is the core element of the process. You’ll need the specific ROM file that you intend to install. Obtain this file from reputable sources to ensure its integrity and avoid malicious code. Incorrect or corrupted ROM files can lead to bricking the device. Download only the ROM compatible with your device’s model number.
-
Samsung USB Drivers: These drivers establish the communication link between your Samsung device and your PC. Without them, Odin won’t recognize your device. The drivers should be downloaded specifically for your device model from Samsung’s website or other reputable sources.
- ADB and Fastboot Drivers (Optional but Recommended): Although not strictly required for Odin, these drivers provide additional tools for interacting with your device, aiding in troubleshooting or other advanced operations. They provide a more extensive command-line interface to manage the device.
Step-by-Step Guide to Using Samsung Odin
This section outlines the general steps involved in using Samsung Odin. Remember that specific instructions might vary slightly depending on the ROM and your device model. Always refer to detailed guides specific to your device and chosen ROM.
-
Back Up Your Data: This is the single most critical step. ROM flashing will erase all data on your device. Back up all your important contacts, photos, videos, applications, and other data using cloud services (Google Drive, Samsung Cloud, etc.) or by transferring the data to your PC.
-
Download and Install Necessary Drivers: Make sure you have the Samsung USB drivers installed correctly. Restart your computer after installation to ensure the drivers are active.
-
Download Odin: Obtain the Odin tool from a trustworthy source. Avoid downloading from untrusted websites.
-
Enter Download Mode on Your Samsung Device: Turn off your device completely. Then, press and hold a specific combination of buttons (this combination varies by model – search online for instructions specific to your model). This will boot your device into Download Mode, indicated by a warning message.
-
Connect Your Device to Your PC: Connect your Samsung device to your PC using a USB cable.
-
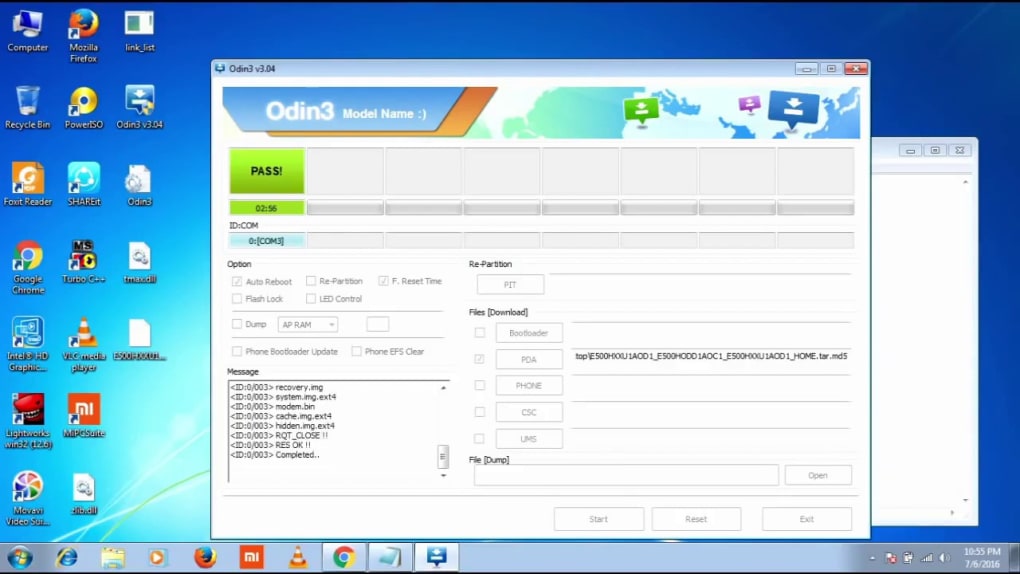
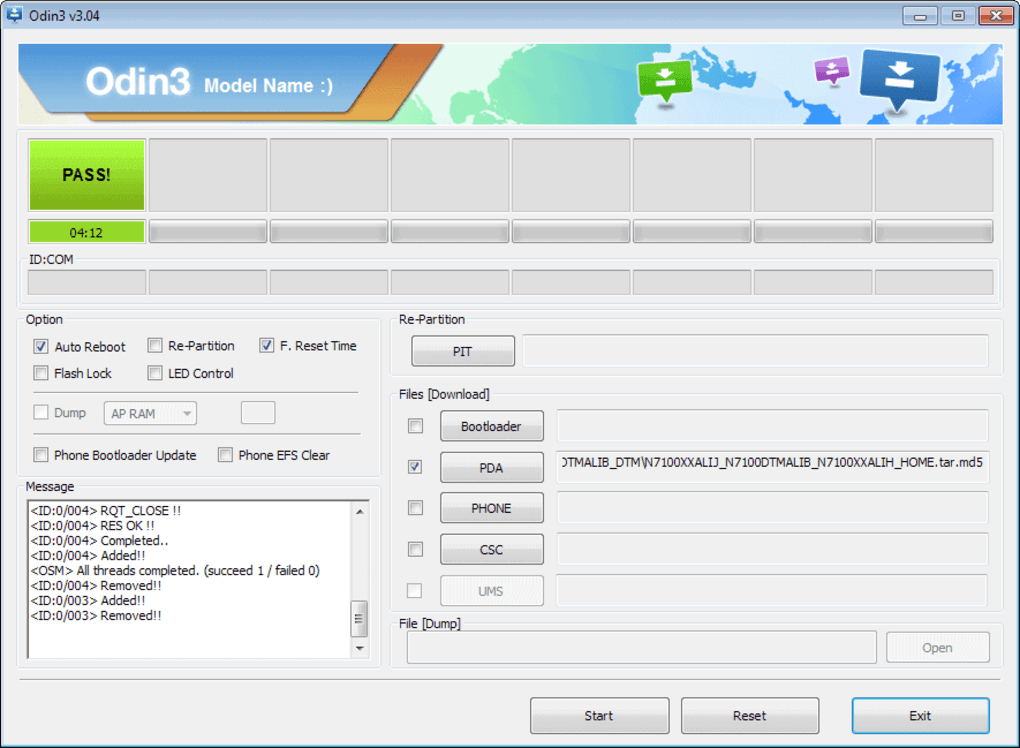
Open Odin: Launch the Odin program on your PC.
-
Load the ROM File: In Odin’s interface, locate the appropriate sections for loading the ROM file (usually labeled “AP,” “BL,” “CP,” “CSC,” and “HOME_CSC”). Carefully select the correct files, ensuring they match your chosen ROM and device. Mismatched files can brick your device.
-
Start Flashing: Once all the files are loaded correctly, click the “Start” button in Odin. The flashing process will begin and may take several minutes.
-
Monitor the Process: Watch the Odin interface for progress indicators. Any errors displayed should be carefully noted for troubleshooting. Do not interrupt the process.
-
Device Reboot: After successful flashing, your device should reboot automatically. If not, you may need to manually restart it.
-
Initial Setup: The first boot after ROM flashing might take longer than usual. You will likely need to go through the initial setup process, similar to a new device.
Potential Risks and Precautions
ROM flashing, while offering significant customization options, carries inherent risks. Improper use of Odin can lead to several issues, including:
-
Bricking Your Device: This is the worst-case scenario, rendering your device completely unusable.
-
Data Loss: Even if the flashing process succeeds, there’s a risk of data loss, unless a proper backup was performed beforehand.
-
Software Instability: An incompatible ROM or errors during flashing could lead to software instability and various malfunctions.
- Voiding Your Warranty: Modifying your device’s software will almost certainly void any remaining warranty, leaving you responsible for any repairs.
Therefore, proceed with extreme caution. Thoroughly research the ROM you intend to install and follow instructions meticulously. Ensure your device is properly charged before beginning the process.
Alternatives to Samsung Odin
Several alternative tools exist for flashing ROMs on Android devices, although they may not support all Samsung models or offer the same level of compatibility. Some popular alternatives include:
-
Heimdall: An open-source alternative to Odin.
-
Other Custom Tools: Various custom tools and methods exist depending on the specific device and ROM. Researching options specific to your device is advisable.
Disclaimer: This guide provides general information about Samsung Odin and ROM flashing. The process carries inherent risks, and any actions you take are solely at your own risk. We are not responsible for any damage to your device or data loss resulting from using Odin or flashing a custom ROM. Always thoroughly research and understand the process before attempting to flash a custom ROM. Consult reputable Android modding communities and forums for detailed instructions and support specific to your device model.
File Information
- License: “Free”
- Version: “3.14.4”
- Latest update: “May 3, 2022”
- Platform: “Windows”
- OS: “Windows 8.1”
- Language: “English”
- Downloads: “28.5K”
- Size: “4.51 MB”


